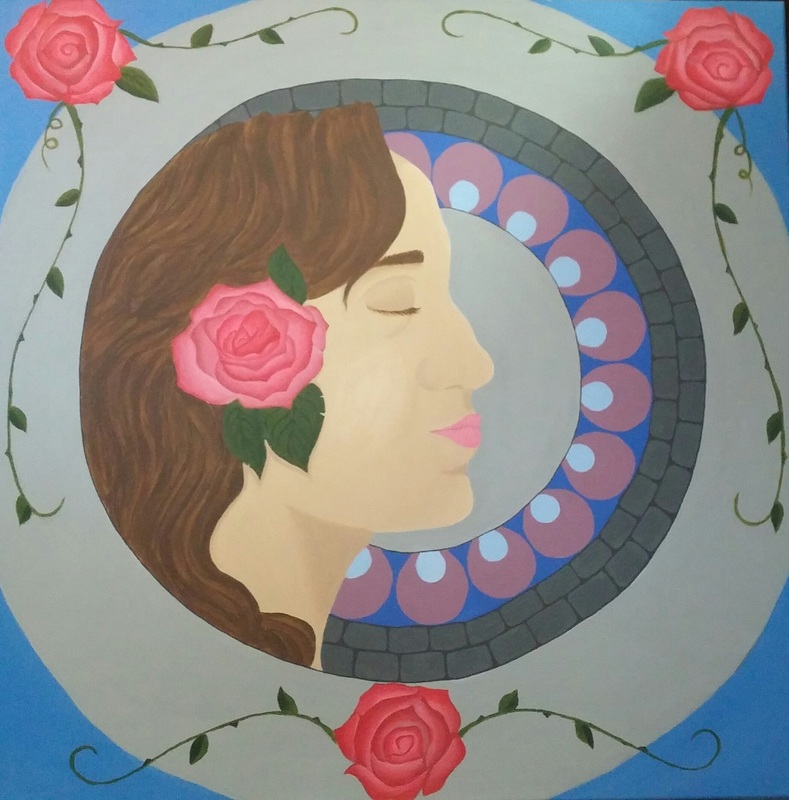
Self Portrait
|
Title:Self Portrait
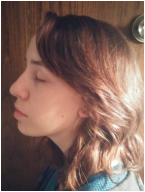
Size:91.44cmX91.44cm Medium:Acrylic on Canvas Completion:December Intentions:I wanted to show my natural "beauty" using the art movement Art Nouveau and the modern day artist K. Crick. I had never been startlingly beautiful. When my face is relaxed it looks aged, just as it is displayed with my painting. The background and the roses were my attempt at depicting what I believe I look like on the inside and to display my inner beauty. Made or Found:Made |
|
Artist & Culture
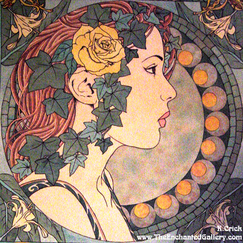
Untitled Art by, Kimberly Crick
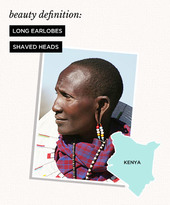
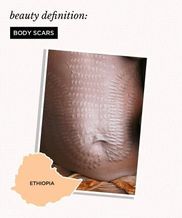
Crick, Kimberly. "About Artist Kimberly Crick, Biography F.A.Q. Q&A Craft Business." The Enchanted Gallery. N.p., n.d. Web. 28 Nov. 2015. When doing this project I also was inspired by the different definitions of beauty from around the world. In Kenya shaved heads and long earlobes are seen as desirable. In Ethiopia's Karo tribe scarred skin is seen as beautiful. Keeping this in mind while painting my self portrait helped gain a deeper understanding of what beauty is. Beauty is not what the magazines sell, beauty is in the eye of the beholder. |
I specifically chose the art movement, Art Nouveau, because in its earlier production it featured what can be considered in today's society as, "imperfect" women. They were curvier women, women where breast size didn't matter, neither did facial features, or face shape. It advertised the woman's natural beauty to advertise a product. Art Nouveau is not a very life like art style, which made creating my first self portrait a little easier. I chose this piece by Kimberly Crick specifically, because of its simplicity, compared to other Art Nouveau artists. This inspiration allowed me to exhibit my natural state instead of hiding it behind hair and flowers.
Smith, Erica. "How Beauty Is Defined Around the World." TotalBeauty. N.p., n.d. Web. Nov. 2015.
|
Process
|
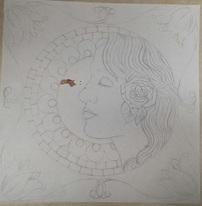
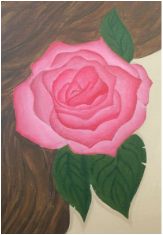
I began by creating a planning sketch of what I wanted to incorporate from my inspiration piece and what I wanted to add to make it my own. I decided to keep the circle rings that would frame my face nicely, and the rose in the hair. I had originally sketched a different flower bordering my edges, but I later switched it to more roses. My middle name, Rose, has always been a big part of my life, especially when I am in trouble with my father. Whether or not it is because of my middle name, roses became my favorite flower. I believe the flower can also be related to my theme of inner beauty, because before the rose blooms, it doesn't look like much.
Before I moved on I stretched and gessoed my own canvas and painted a grey base coat. To stretch the canvas I had to first cut a piece of the canvas fabric to the size three feet by three feet (the size of the wood frame) with a couple of extra inches left over along the edges. I wrapped the edges of the canvas over the edges of the wood frame and using a nail gun, I stapled the canvas to the edges of the frame, leaving the corners for last. Folding the corners of the canvas, neatly, I stapled them to the frame. Lastly I applied an even coat of gesso over the entire canvas and the edges of the canvas on the back to help prevent fraying. My sketch was then printed onto a projector sheet and projected onto my canvas so I could transfer my design onto it. I first painted the frame around my face and my hair, because it was simple and I could warm up to painting after not having done it for so long. I continued with a base flesh tone for my face and then added highlights and shadows. For two or three hours I worked on the rose on my face. I painted the blue corners to add some contrast to the flowers I was going to put there. Lastly I added the roses in the top two corners and in the center of the bottom of the canvas. If you noticed, they are different in design and detail than the rose that is in my hair. This is because I did not want them to draw attention away from the center of the painting, but instead enhance its beauty.
|
|


Tools
3'x3' Wood Frame-used to stretch the canvas around
Canvas fabric-used to paint on
Nail gun-used to attached the canvas to the wood frame
Gesso-used to tighten the canvas and to make it easier to paint on
Projector Sheet-transfered my sketch onto it so it could be projected
Projector-used to transfer sketch onto canvas
Acrylic paints-used to paint and add color to my sketch
Acrylic paint brushes-used to move the paint on the canvas and create detail
Pallet Knife-used to mix paints together
Pallet-used to store those paints
Water cup-used to clean my brushes
Towel-used to dry the brushes
Reflection
I am most proud of this piece, because I invested the most time in it and got the best result. I feel like an accomplished artist now that I know how to stretch my own canvas. This painting is a huge part of me and I feel as though it displays my natural beauty nicely, no cosmetics, or digital enhancing needed. I definitely had some design troubles when it came to what would border my painting. I originally had different flowers planned, but a painting accident happened where I needed to repaint everything grey except my face and the rings around it. In order to alleviate some stress, I had decided to replace the original design with roses, because it was something I already knew how to paint. I ended up appreciating the roses a lot more than I had the original flowers. If I were to improve this painting, I would outline everything with a thin black line, in true Art Nouveau style. I'd like to experiment with more realistic paintings in the future.
