Perseverance: Dry Point
|
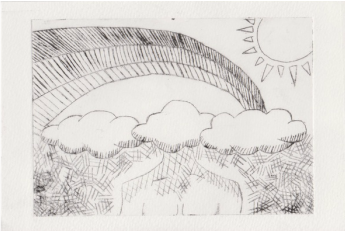
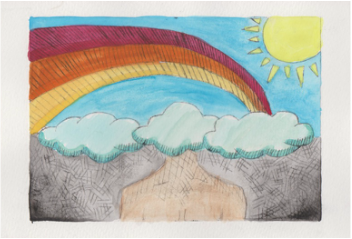
Title:Perseverance
Size:23cm x 15cm Medium:Dry Point on Paper Completed:October Intentions:I wanted to show myself inside out. The bottom half represents how the daily grind impacts my body. The top half displays the mentality I try to maintain to stay afloat. The art movement Surrealism allowed me to create something that was dreamlike. The middle class culture relates to my piece, because they are also working for a comfortable life, this takes a toll on their bodies, as well. Made or Found:Made |
|
Artist & Culture
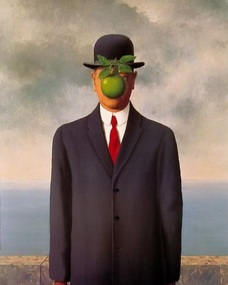
Son of Man by Magritte
"The Son of Man, 1946 by Rene Magritte." The Son of Man, 1946 by Rene Magritte. N.p., 2009. Web. 15 Oct. 2015. |
The art movement Surrealism provided me with an opportunity to unrealistically portray my mind in an "inside out" way. It gave me creative freedom. Using Surrealism I demonstrated the happy, cheery, and positive outlook on life that I consistently try to have. It is improbable that a head would be replaced by fluffy clouds, a shining sun, and a rainbow in real life. These images are usually associated with positivity. The culture I related to was the middle class. I am middle class and I see myself in a future with a decent job, a nice house, and raising a family. However, the daily grind to get to this point puts a seemingly enormous stress on the body. Even at this age I am working with the weekend in mind, those two days of rest before it all starts over again. Working for what I desire and need takes a daily toll on my body. I believe my experiences in the middle class can be related universally to others in the middle class.
|
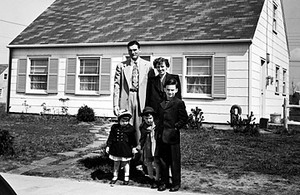
A family in front of its home in a new housing development by, Bernard Hoffman
Suddath, Claire. "The Middle Class." Time. Time Inc., 27 Feb. 2009. Web. 15 Oct. 2015. |
Process |
Slide Show of Process |
|
I brainstormed what I wanted to convey to the audience. I was toying with the idea of showing the audience not only how much my lifestyle took a tole on my body, but also why, for the majority, I am a positive person. I decided to base my piece around the theme of inside out. Both halves of the print are inside out. Physically my body does not appear to be broken down, or beat up, or strained. Nobody can see that my inner thoughts, that I attempt to display daily, are genuine. No one knows that I need to keep the positive mentality to stay afloat from the days of work, of attempting to find balance between my relationships, and lack of sleep, from trying to cram 25 hours in a 24 hour day. The process began with creating planning sketches. The first was the outline of a woman's body, then a woman's body cut off in certain location with shadowing and clouds, and the last sketch was the sun and the shaded rainbow. Then I combined all the sketches on one piece of paper that I cut to fit the size of the Plexiglas plate. This sketch had all the shadowing using cross hatching, which is one of two ways for value to be seen in the dry point. The sketch was then taped to the Plexiglas plate. I proceeded to carve out my design, using the sketch underneath it as an outline, with a thin, linoleum, carving tool. This all ended when I completed the printing process.
|
|
Printing Process
Tools
Plexiglas Plate - carved into to create something similar to a stamp for an image you want to print
Linoleum Carving Tool- knife-like and sharp, used to carve into the plastic material
Water Color Paper- what the dry point was printed on
Tub with Water- used to soak the paper
Clean Towels- used to dab dry the paper
Water Based Ink- coated the dry point and made the image visible on the paper
Plastic Palette Knife- used like a butter knife to force ink into the carvings
Newspaper- used to wipe off all excess ink
Printing Press- helped make the transfer of ink from the dry point to the paper
Plastic Gloves-to maintain clean hands
Steps
1. Soak the water paper in the tub of water for nine minutes
2. Take out at nine minutes and place between two clean towels, dab dry, and keep covered for future use
3. Put on gloves and use the palette knife to scoop a small amount of ink out of the container and onto the Plexiglas plate and then forcibly spread it all over the Plexiglas plate to get the ink into the carved out spaces
4. Rub off all the access ink on both sides of the plate, the only thing that should have ink in it is the groves that you carved
5. Take off the gloves and with clean fingers, move the previously soaked water paper onto the printing press between the linoleum cover and the bottom.
6. Center the dry point and place it on top of the paper
7. Cover it with the linoleum covering, and crank the press till it comes out the other side, stopping about an inch from the end of the linoleum
8. Remove the plate from the paper (carefully)
9. Take the now printed on piece of paper somewhere to dry safely
Reflection
The dry point was by far, more challenging than the block printing. The dry point printing process was a mess and in a class period, I could only make seven prints, because the process was so tedious. Attempting to clean all the ink off took at least 15 minutes per new print. In block printing I could have made close to twenty prints in a class period, because the process was simpler. Getting a clean print, with the darkness I was looking for was difficult, but after several tries I created a satisfactory product. Also the material we were given to scratch into, in my opinion, was difficult to carve the lines I wanted. I am sure that if I did it again it would be better, because my technique would be developing even more However, I could apply a little of my knowledge from the block print to the dry point when it came to carving. Dry point is similar because what is carved out is black, but in contrast what is carved out in the block print turns white. I also was able to use similar carving techniques. If I had to do another dry point I think I would have thick lines, that intentionally were a little sloppy, to create an interesting sketch-like effect. This would also aid in masking any poor lines I carved. For my first dry point I am satisfied with my work. I do not think it exceptional, and I know I could do better in the future.
